MM_STD_07 |
|
|
|
|
Now it's time for the payoff. Since this series started with a question about the Time Reversal of Mills Mess, let's start our analyses with that.
We need to start by working out what Mills Mess is on the diagram. On the way we'll see some of the limitations of the diagram, as well as the basic power of the technique.
Mills Mess. I'll start the description and analysis from where you have the left arm crossed over the right, and you're about to do an exchange with the left hand. This throw therefore comes from the right side. Here's a full description of the sequence of throws:
| Step | Hand | Side | Arms |
| 1 | Left | Right | Crossed - left on top |
| 2 | Right | Right | Uncrossed |
| 3 | Left | Right | Crossed - right on top |
| 4 | Right | Left | Crossed - right on top |
| 5 | Left | Left | Uncrossed |
| 6 | Right | Left | Crossed - left on top |
All catches are made more-or-less in the middle of Juggle Space. Remember that, and we'll come back to it later.
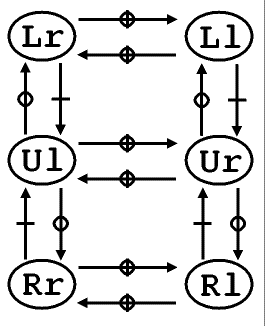
So, what does all this mean on the diagram? We can easily write down what the states are, so let's add them to the chart above ...
| Step | Hand | Side | State | Arms |
| 1 | Left | Right | Ll | Crossed - left on top |
| 2 | Right | Right | Ur | Uncrossed |
| 3 | Left | Right | Rl | Crossed - right on top |
| 4 | Right | Left | Rr | Crossed - right on top |
| 5 | Left | Left | Ul | Uncrossed |
| 6 | Right | Left | Lr | Crossed - left on top |
 |
Throw 3 is with the left hand from the right side of the body and the catch is in the middle of Juggle Space. This means that between the throw and catch of the exchange the hand moves to the left. That makes it an inside exchange. Let's put that in, along with all the other transition types, just for the sake of completeness.
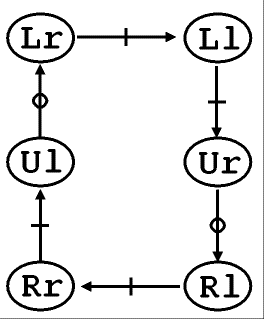 |
Well, at the very beginning we assumed that the exchange happened more-or-less in a single location. This isn't true in Mills Mess. When going from Ll to Ur with our inside exchange, the catch happens when the arms have uncrossed. This contrasts with the assumption that the throw and catch happen, and then the hands move to their new places.
However, the notation doesn't really cover the actual hand positions. This is one of its major limitations, although there are ways of getting around it. In fact, when you're juggling, your Dwell Time tends not to be extremely long. This means that, in general, the catch happens close to the position specified by the next state, not this one.
A specific example is the Ll to Ur transition. If we did have the long Dwell Time then the catch would happen with the arms still crossed. However, for Mills Mess the catch happens in the uncrossed position, as specified by the next state.
We will assume from here on that this is, in fact, the case. We'll assume that the catch happens close to the position specified by the next state.
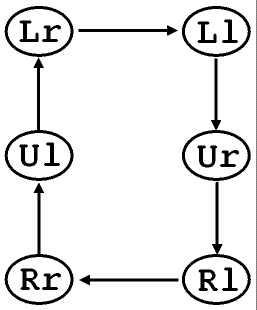
So, Mills Mess is a clockwise traversal of the diagram, following the "inside exchange" arrows whenever you have a choice. And the Time Reversal ?? That's the subject of the next page.
MM_STD_08
Contents |
Links on this page |
|
 Suggest a change ( <--
What does this mean?) /
Send me email
Suggest a change ( <--
What does this mean?) /
Send me email|
|
Quotation from Tim Berners-Lee |
|